This article first appeared in Studio
Potter, Volume 8, Number 1 (December 1979).
Copyright © 1979 by
Studio Potter. All rights reserved.
May be reproduced with permission of
Studio Potter.
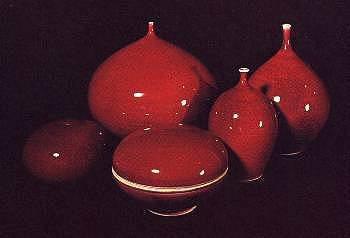
I've had a love affair with copper red glazes ever since I started making pots. The first red piece I remember seeing was an old Chinese jar in the Portland (Oregon) Art Museum. Since that day it has almost become a ritual with me to fire a red pot, or at least put a couple of tests in every kiln load. My potter friends sometimes questions my frequent use of red glazes. Most of them say copper reds are usually hard to achieve but once mastered, what more is there? And a few people tell me that red glazes are too flashy, or just plain boring, or that not enough happens on the surface of the pot. To me, however, a good red glaze has a multitude of colors and a richness unduplicated in any other glaze.
I was excited while loading the very first test formulae of copper red glazes I had found in an obscure ceramics manual. Thoughts of beautiful, sensual reds ran through my head during the firing. The next day, however, I was greeted with matt, liver-pink colors. Since then I've tried many formulae, with varying results, but it is my opinion that any formula is only as good as the manner in which it is fired.
In some of my earlier firings, I noticed that if reds were close enough to a lighter colored, shiny glaze, the copper would flash off and create a red blush on the pot next to it. Sometimes there would only be a small spot of red left on the original pot, while the rest of the pot would be clear white. Significantly, the red that remained always had the richest color. This led me to believe that the point where the copper in the glaze is almost all reduced off is where you achieve the best reds. This can happen only when the firing time and the amount of reduction are carefully controlled. The glaze formula one selects should be glossy at the peak of the firing, but need not be running off the pot to make a good red. One must be able to apply a red glaze fairly thickly so it can make it through the higher fire reduction periods without dissipating its copper content. There are all sorts of simple methods one can use to ease this problem:
Through all my experimentation, I've found that good results can be achieved in almost every firing by making the entire kiln load copper reds. This allows the copper in its gaseous state to flash from pot to pot and not just disappear up the stack. I use a small fourteen cubic foot gas kiln to fire my reds. Firing time from start to finish runs ten to twelve hours. This gives the carbon plenty of time to enter the glaze. After that I keep the kiln in a light-to-medium reduction for one hour, then fifteen minutes of oxidation. I repeat this process until large cone 8 goes down. Then I put the kiln into straight oxidation until cone 9 is flat. This clears the surface of all excess carbon. I find if this procedure is not followed, the glaze tends to have a smoky or muddy appearance. This firing cycle, combined with whatever glaze formula one chooses, should give a start on achieving a good copper red.
Here are my copper red formulae, as well as a few of my friends' formulae:
| No. 1 (c/9-10) | |
|---|---|
| Kingman feldspar | 40.0 |
| Silica | 80.0 |
| Nepheline syenite | 40.0 |
| Soda ash | 30.0 |
| Whiting | 36.0 |
| Tin oxide | 4.0 |
| Bentonite | 2.0 |
| Copper carbonate | 1.0 |
| No. 2 (c/9-10) | |
|---|---|
| Kingman feldspar | 51.80 |
| Silica | 25.55 |
| Whiting | 8.75 |
| Colemanite | 6.50 |
| Dolomite | 2.30 |
| Zinc oxide | 2.20 |
| Tin oxide | 1.00 |
| Copper carbonate | 1.00 |
| Red iron oxide | .90 |
| No. 3 (c/8-10) | |
|---|---|
| Kingman feldspar | 25.0 |
| Silica | 25.0 |
| Nepheline syenite | 25.0 |
| Colemanite | 17.5 |
| Barium carbonate | 10.0 |
| Whiting | 2.5 |
| Copper carbonate | 1.0 |
| Tin oxide | 1.0 |
| Red iron oxide | .5 |
| No. 4 (c/9-10) | |
|---|---|
| Nepheline syenite | 20.00 |
| Kingman feldspar | 15.24 |
| Silica | 35.24 |
| Whiting | 15.40 |
| Colemanite | 10.57 |
| Tin oxide | 1.68 |
| EPK china clay | 1.45 |
| Copper carbonate | .42 |
| No. 5 (c/9-10) | |
|---|---|
| Nepheline syenite | 16.14 |
| Kingman feldspar | 15.00 |
| Silica | 29.36 |
| Colemanite | 14.10 |
| Zinc oxide | 8.27 |
| Barium carbonate | 6.70 |
| Talc | 6.43 |
| Copper carbonate | 2.00 |
| Tin oxide | 1.50 |
| No. 6 (c/9-10) | |
|---|---|
| Kingman feldspar | 136.0 |
| Silica | 77.4 |
| Whiting | 29.8 |
| Tin oxide | 5.8 |
| China clay | 9.9 |
| Barium carbonate | 13.7 |
| Dolomite | 10.0 |
| Zinc oxide | 2.0 |
| Copper carbonate | 1.0 |
| Iron oxide | .5 |
| Colemanite | 14.4 |
All my red glazes were tested on and then used over a white stoneware or porcelain clay. They could also be used over dark stoneware, but I find they develop a deeper richness in color over a light background. If one wants to become involved with a white clay, try brushing a layer of white slip over the darker clay. If these formulae have a firing range that is too high in temperature, or if they are not melting enough to produce a good red, try replacing some of the feldspar with nepheline syenite. If a glaze seems to be almost right, but too matte, and if adding more flux changes its composition too much, try dipping a thin layer of one's favorite celadon over the base red glaze for better results.